Search The Web

Sunday, July 14, 2013

Who is Hosting my Domain Email?

Who is Hosting my Domain Email?


To find out who is hosting your domain email is pretty easy. Here's how you do it:

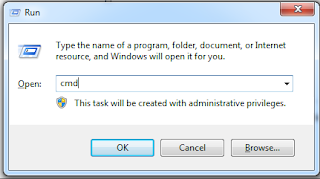
  1. Open a command prompt (shortcut to do this is hold down Windows Key and the R Key, then type CMD in the Run window) 
  2. In the command prompt window type in
            NSlookup
            set qtype=mx
            (please note that this is entered without the www)

This will query your DNS and present you with the mail server for your domain - pretty easy!


Thursday, June 6, 2013

How To Fix Windows Update Issues in Windows 8, 7, Vista, Server

How To Fix Windows Update Issues


Windows update can cause several issues, often leaving you with a cryptic error message such as 0x8024402c, 80070643, 8024800A or many others. Alternatively, you may also get an error like "Windows update cannot check for updates because the service is not running" . This article will go through how to troubleshoot Windows Update issues as a whole.Instructions for various specific issues such as those shown above can also be found on this site (just use the search feature to locate them).

Before making any changes to your system, please create a restore point or make a backup of any important work such as photos or documents. If you are unsure on how to create a restore point, please consult this Microsoft article: http://windows.microsoft.com/en-au/windows7/create-a-restore-point

How To Fix Windows Update Issues

Windows Update Fix It Tool

This tool is a great starting point for troubleshooting Windows Update and is highly successful in resolving a variety of issues. The Tool can be downloaded here: http://support.microsoft.com/mats/windows_update/ . At the time of writing there was no Windows 8 64 Bit version of this tool, hopefully Microsoft will make a version available in the near future.

Also available is The System Update Readiness tool, located here: http://windows.microsoft.com/en-au/windows7/what-is-the-system-update-readiness-tool . This tool will troubleshoot your system and solve any problems. The program is not very verbose, in that it doesn't really tell you what its doing, however it is effective in rectifying common Windows Update Issues.


Windows Update Log


For Those who wish to do further troubleshooting or if the above tools do not solve your issue, the Windows Update Log is a great place to start looking for clues as to what is going on. to access the log open a Run Command and type (or just copy from this blog) %Windir%\windowsupdate.log and press Enter. I have included a snippet from a log below:.

How To Fix Windows Update Issues

In this case, the log is displaying that error 0x800f0902 has occurred where Windows was unable to download updates. This is a fantastic starting point for further troubleshooting of issues that are occurring.

Windows Services

There are three main services involved with Windows Update, the Windows Update Service, Background Intelligent Transfer Service (BITS ) and the Workstation Service. If any of these are not started and running, Windows will be unable to apply updates.

To access the Windows Services open a Run Windows (Windows Key + R) and enter services.msc . This will open a Microsoft Management Console (MMC) showing Running Services.
How To Fix Windows Update Issues

For each of the above services check the following:
  1. Scroll down till you find the service (in this case Background Intelligent Update Service). as seen in the picture, the status should be Running and the Startup Type should be :
    • Automatic (Delayed Start) for the BITS service
    • Automatic for the Workstation Service
    • Manual (Trigger Start) for the Windows Update Service - (note that on some Windows 7 Systems it may also be set to Automatic Start)
  2. If the services are shut down, or not set to the appropriate start up type:
    • Double Click on the Service. This will open the Properties Window for the service
    • Change the Startup Type to the correct mode and /or click start to start the service
      How To Fix Windows Update Issues
  3. If the service will not start, then a good thing to do is run the above Fix It Tool or System Update Readiness Tool and see the results. failing that, consult the Windows Update log as also shown above.


Deleting Windows Update File Locations


If you have an update that will not successfully install (e.g. it repeatedly tries to install but fails when shutting down) or further investigation has suggested, it may be necessary to manually delete the files and folders containing Windows Update data and database. Please ensure that you have backed up any data or created a restore point before deleting any files

Note that before doing this you may need to stop with Windows Update Service. - see above for instructions on how to locate the service. once found double click the service to expose the properties window and choose stop. After you can either reboot to start the service or double click and choose start

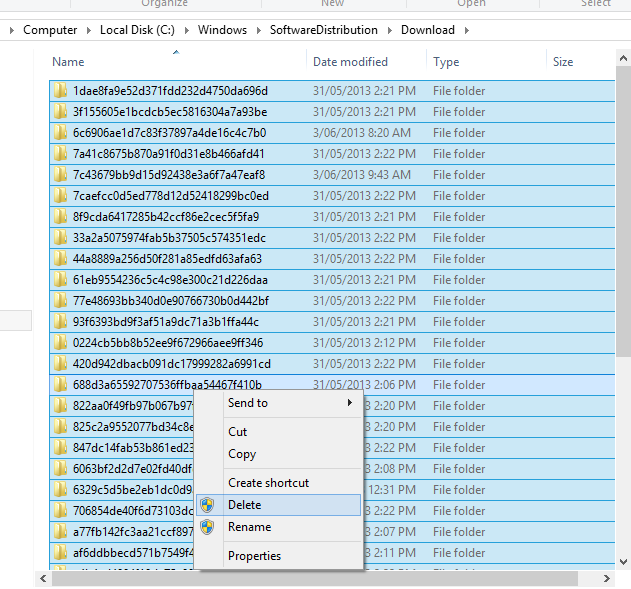
The Windows Update download location can be found at C:\Windows\SoftwareDistribution\Download . This is the repository where windows stores downloaded updates.
How To Fix Windows Update Issues

Its normally OK to delete these files as they are just the installers, not the actual applied updates. To delete these , click on the window, and press Control and A . This will highlight all the items in the screen. Right Click and choose Delete. answer YES to any verifcation prompts.
How To Fix Windows Update Issues

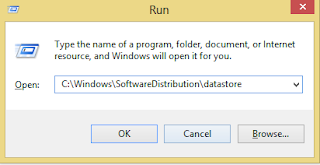
The Windows Update Download location is found at C:\Windows\SoftwareDistribution\datastore . 
How To Fix Windows Update Issues

This is the actual location of the Windows Update Database. if this database is corrupted then it may be easiest to delete it. Windows should create a new database automatically. To delete the database, open the location above click on the window, and press Control and A . This will highlight all the items in the screen. Right Click and choose Delete. answer YES to any verification prompts.
How To Fix Windows Update Issues

Uninstall Windows Updates


Occasionally you will installa n update that may not play nice with your system due to incompatibility with other installed programs, a failed install or occasionally an update that is not functioning as Microsoft intended. to remove these updates:
  1. Open Control Panel
    • In Windows 7 / Vista / 2008 go to Start -> Control Panel
    • In Windows 8, or Server 2012 go to the Start Screen  and type Control Panel. this will bing up the control Panel Icon. Choose this Icon
      How To Fix Windows Update Issues
  2. Select to view by Small Icons (Optional) then choose Programs and Features
    How To Fix Windows Update Issues
  3. in the left hand corner, select View Installed Updates
    How To Fix Windows Update Issues
    How To Fix Windows Update Issues

From this location you can uninstall any updates that you are having problems with. The trick here is to know which update you are looking for that is causing you a problem. This may be identified by either the Windows Update Log (see above), Windows Event Viewer, personal observation or other knowledge base searches.


This article has discussed various ways of troubleshooting Windows Update problems and how to resolve them.


Wednesday, June 5, 2013

How To Shut Down or Restart Windows 8

How To Shut Down or Restart  Windows 8


Shutting down or restarting Windows 8 has proven to be a little tricky for users used to the old tried and true method of going to Start then -> Shut down as has been done in previous versions of Windows. In this article we will show you 3 Different ways to shut down and restart Windows 8.

Method 1: The Windows 8 Power Icon


  1. Hover your icon / mouse over the right hand lower corner to expose the Charms Bar as shown on the right:
    How To Shut Down or Restart  Windows 8
  2. The bottom Icon is labeled Settings. Tap / Select this to open the Settings Window
    How To Shut Down or Restart  Windows 8
  3. In the lowest half of the Settings window, choose Power
  4. You will now have the options to Sleep, Shut Down or Restart your Windows 8 Computer
    How To Shut Down or Restart  Windows 8

Method 2: Create a Windows 8 Shut Down and Restart Tile


  1. Go to the Desktop (Press WindowsKey-D or go the Start Menu and choose Desktop)
    How To Shut Down or Restart  Windows 8
  2. Right click on a blank area and choose New, Shortcut
    How To Shut Down or Restart  Windows 8
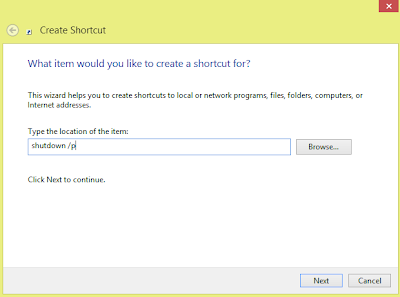
  3. In the location field / box type shutdown /p and press next
    How To Shut Down or Restart  Windows 8
  4. Enter a name for the Shortcut such as Shutdown and choose Finish
    How To Shut Down or Restart  Windows 8
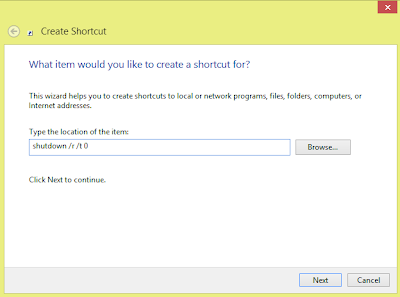
  5. (optional) To create a restart icon, follow steps 1 - 4 but enter shutdown /r /t 0 in the location field
    How To Shut Down or Restart  Windows 8
  6.  To attach this short Cut to your  Start Menu, right click and choose Pin to Start
    How To Shut Down or Restart  Windows 8

Method 3: Use the Power Button to restart Windows 8


  1. Go to the Start Screen and start typing Control Panel . This will show Control Panel in a list of results.
    How To Shut Down or Restart  Windows 8
  2. Select (click) the Control Panel Icon.
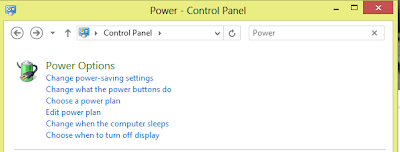
  3. Locate the Search box (normally located in the top right hand corner) and type Power . This will show the computers Power Options.
    How To Shut Down or Restart  Windows 8
  4. Select Change What Power Options Do
  5. The Setting for When I press the Power Button is defaulted to Sleep. change this to Shut Down. On a Laptop you may need to set this for both On Battery and Plugged In
    How To Shut Down or Restart  Windows 8
  6. Choose Save Changed to save these settings
And that's it! 3 Different ways to easily Shut Down and Restart Windows 8.

This Article can also be located on our sister site DizzyIT.com at: 


Monday, May 27, 2013

Windows Update Error 0x8024402C in Windows 7, 8, 2012, 2008 R2, Vista

Windows Update Error 0x8024402C in Windows 7, 8, 2012, 2008 R2, Vista


Windows Update Error 0x8024402C occurs when running windows update and you try to connect to the Windows or Microsoft Update Website.

Please see this post for an overview of how to troubleshoot Windows Updates: How to Troubleshoot Windows Update Issues

if you view the logs located at: %windir%\windowsupdate.log you may also see this error present like this:

FATAL: SelfUpdate check failed, err = 0x8024402C
2013-05-11 11:41:27:095 1208 2344 Agent  * WARNING: Skipping scan, self-update check returned 0x8024402C
2013-05-11 11:41:27:095 1208 2344 Agent  * WARNING: Exit code = 0x8024402C


This issue is commonly caused by Firewall Settings not being correctly set within Internet Explorer. There are 3 ways in which you can attempt to correct this error:

Method 1:

Download and run the Microsoft Windows Update Readiness Tool located at: http://support.microsoft.com/kb/947821 . If this fails to solve the issue then please try one of the other methods.

Method 2:

This Method is for if you ar ein a corporation or campus that uses a Proxy Server.
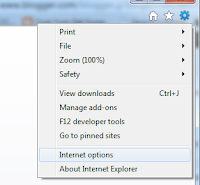
  1. Open Internet Explorer and go to Tools -> Internet Options
    Windows Update Error 0x8024402C
  2. Click on the Connections Tab, select LAN Settings and choose OK
    Windows Update Error 0x8024402CWindows Update Error 0x8024402C
  3. Choose the Advanced Button
  4. Clear any entries under the exceptions window and choose OK
    Windows Update Error 0x8024402C
  5. Open a command prompt:
    1. In Windows 7, Vista, 2008 either:
      1. Go to start  chose run and type in cmd and press OK . Or:
      2. Type command prompt into the search bar in the start menu
        Windows Update Error 0x8024402C
    2. In Windows 8 
      1. Go to the Start Screen and type command prompt. This will open a search screen where you can then select command prompt from the right hand side
        Windows Update Error 0x8024402C
  6. in the command prompt window, enter the following pressing Enter After each command
    1. netsh winhttp reset proxy
    2. net stop wuauserv
    3. net start wuauserv
      Windows Update Error 0x8024402C
  7. restart the computer and try and install updates again
Method 3:
  1. Open Internet Explorer
    Windows Update Error 0x8024402C
  2. Go to Tools -> Internet Options
    Windows Update Error 0x8024402C
  3. Click on Connections -> LAN Settings
    Windows Update Error 0x8024402C

    Windows Update Error 0x8024402C
  4. Select Automatically Detect Settings 
    Windows Update Error 0x8024402C
  5. Choose OK
  6. close and re open Internet Explorer and try installing updates again.


Thursday, May 23, 2013

Delegate Authority in AD to add and remove computers

Delegate Authority in AD to add and remove computers


Delegation of Authority in AD is a good idea to manage the level of access given to technicians. Normally, authenticated users within the AD environment (i.e users) can add up to 10 machines to a domain. after this, the privilege is revoked.

When configuring these settings, it is advisable to set only on the OU's that you wish to delegate the authority on. Many times, its too easy to just want to save time and effort and set this at the top level of the domain, however this will come back to bite you big time if your help desk lackey deletes your domain controllers......

In order to configure the delegate authority to add and remove AD computers do the following:

  1. Open up AD users and computers and navigate to the OU that contains the workstations / servers that you wish to delegate. 
  2. Right click on the OU and select Delegate Control
  3. click Next past the welcome screen
  4. select the group  you wish to delegate access too, e.g. a group named helpdesk or level1_techs etc.
  5. choose create a custom task to delegate and choose Next
  6. select only the following objects in the folder and then select Computer Objects as well as the tick boxes Create selected objects in this folder and Delete Selected objects in this folder. Choose Next
  7. In the Permissions window, select:
    1. Create all Child Objects
    2. Delete all Child Objects
    3. Read All Properties
    4. Write All Properties
    5. Change Password
    6. Reset Password
    7. Validated Write to DNS Host Name
    8. Validated Write to Service Principal
  8.  Note that several other sub settings will be enabled after choosing the above settings. Leave these as they are and choose Next
  9. Choose Finish to finalize the settings.
And that's it! As always, you should now thoroughly test these settings prior to distributing to them the required users to ensure that they have the required level of permissions (ie not too many and not too few). an easy way to test this would be to get the user to add or re add a workstation to the domain.

of course there are several other things you can do with delegation of authority including assigning permissions for user creation many other settings.

The above article discusses how to delegate authority in a Windows Active Directory domain for adding and removing workstations or computers.

This article can also be located on our sister site DizzyIT.com at http://dizzyit.com/2013/05/23/delegate-authority-ad-add-remove-computers/

Tuesday, May 14, 2013

Allow Remote Desktop or Remote Assistance Connections through Windows Firewall


Allow Remote Desktop or Remote Assistance Connections through Windows Firewall

To Connect to a remote session, the receiving computer must be able to communicate with your computer. In order to do this, you or the administrator may need to open a port in the firewall to allow this connection to happen. This is a common pain point and something that many administrators forget to do from time to time! When you choose to Enable a remote desktop Connection, the system may do this for you, however this is not always the case. Luckily, its quite simple to allow a remote desktop connection through the Windows Firewall:
  1. Open Control Panel and Choose Windows Firewall
  2. In the top left hand corner choose Allow a program or Feature through Windows Firewall
  3. you are now presented with a list of programs. Scroll down to R where you will see 3 options pertaining to Remote Desktop / Assistance:
    1. Remote Desktop - Choose this to allow remote Desktop Services
    2. Remote Assistance - Choose this to allow shared screen remote assistance to your machine
    3. Remote Desktop - Remote FX - this is a Windows 7 Service Pack 1 / Server 2008 R2 and later feature that provides a rich desktop experience for features like sound and graphics.
  4. Choose the options pertaining to you by ticking the box in the connections you will allow this for ( Domain, Home / Work, Public)
  5. Choose OK
  6. you have now allowed remote desktop and / or remote assistance connections to your computer. to disable this, just un tick the boxes you have ticked in the firewall.

To Connect to a Remote Desktop Computer


To Connect to a Remote Desktop Computer

  1. To open a remote desktop connection, either:
    1. go to Start then Run and enter mstsc and press OK
    2. go to Start, All Programs, Accessories, Remote Desktop Connection
    3. In the Computer field, enter the Computer Name or IP Address of the computer you wish to connect to. If you are unsure of what this is, a few simple ways to find out are (these are done on the remote computer)
      1. ask your administrator / help desk / remote desktop provider for the address needed
      2. Open a Run Command (go to Start and Run or Windows Key + r), enter ipconfig  and look for the IPAddress field. you may need to scroll up to see this. you may also, depending on the configuration have a couple to choose from.
      3. open a Run Command (start and Run or Windows Key + r) and when presented with the black DOS screen, enter hostname. This is the name of the computer.
    4. You can chose the Options button to set parameters such as connection profile, display properties, whether to run specified programs, connection bandwidth and more, however this is optional
    5. choosing Connect will initiate the connection.
    6. you may be prompted for the log in credentials of a user on the remote machine that is allowed connection, enter these details here.
    7. You should now have established a remote desktop connection to another computer