Search The Web

Showing posts with label Internet Explorer. Show all posts

Tuesday, February 25, 2014

This operation has been cancelled due to restrictions in effect on this computer. Please contact your system administrator.

This operation has been cancelled due to restrictions in effect on this computer. Please contact your system administrator.


This error message "This operation has been cancelled due to restrictions in effect on this computer. Please contact your system administrator " occurs when certain programs such as One Note, Outlook and Office 365 are not happy about Internet Explorer being the default web browser.
There are a fewways you can address this issue:

1. Upgrade your internet Explorer to the latest version

Not the most exciting or elegant solution, and perhaps is another version of "shut up and reboot" but its worth a try and I have seen it fix this issue. for security and functionality reasons, unless you have a good reason to its normally recommended to be on the latest version of IE.

2. Set the default browser to IE

This is pretty straight forward
Windows 8:
  •  go to the start screen and type in default programs and then choose this item
Default programs Windows 8
  • choose set your default programs from the menu
Control Panel, Default Programs Windows 8
  • select Internet Explorer then choose set this program as default
Windows 8 Internet Explorer then choose set this program as default
3. Reset Internet Explorer Settings
Sometimes due to policies etc, or registry keys that have been influenced by other programs. these can be reset by setting Internet Explorer back to its default configuration.
to do this its advisable to close any microsoft programs you have open such as Word and Outlook and then,
  • open Internet Explorer
  • choose the Gear Icon for settings then choose Internet Options
Internet Explorer Settings Gear
choose the advanced tab, and then select reset internet explorer
  • choose the advanced tab, and then select reset internet explorer
Reset Internet Options
  • close internet explorer and try again
This post can also be found at our sister site www.Dizzyit.com at: http://wp.me/p1Zlmi-7r

Thursday, January 9, 2014

Remove Protected mode is turned off for the internet and restricted sites zones message in Internet Explorer

Remove Protected mode is turned off for the internet and restricted sites zones message in Internet Explorer


In Internet explorer 10 and 11, when you disable protected mode you will get a warning stating that Protected mode is turned off for the internet Zone or perhaps Protected Mode is turned off for the internet and restricted sites zones. As Protected Mode seems to have some issues of its own, Due to this it's common to want to remove this warning in SOE images where applicable.
image
Protected mode is turned off for the Internet zone in IE
image
Protected mode is turned off for the Internet and restricted sites zone in Internet Explorer

This feature of Internet Explorer is set in the registry at HKCU\Software\Microsoft\Internet Explorer\Main. scroll till you see the dword key NoProtectedModeBanner and this should be set to 1 to disable, or 0 to enable the message should you wish.
Registry Key for Protected mode is turned off for the Internet zone

This can then be applied via Group Policy if you like by opening the GPO editor (start -> run -> regedit) and navigating Computer Configuration -> Preferences -> Registry -> Right Click on Registry and choose New -> Registry Wizard. From here you can navigate to the NoProtectedModeBanner key and assign to the policy as required.
Set Group Policy for Protected Mode message in Internet Explorer
The above article discusses how to remove the protected mode is turned off warning message as seen in Internet Explorer. this article can also be found at our sister site DizzyIT.com at : http://dizzyit.com/2014/01/10/remove-protected-mode-turned-internet-restricted-sites-zones-message-internet-explorer/


Monday, May 27, 2013

Windows Update Error 0x8024402C in Windows 7, 8, 2012, 2008 R2, Vista

Windows Update Error 0x8024402C in Windows 7, 8, 2012, 2008 R2, Vista


Windows Update Error 0x8024402C occurs when running windows update and you try to connect to the Windows or Microsoft Update Website.

Please see this post for an overview of how to troubleshoot Windows Updates: How to Troubleshoot Windows Update Issues

if you view the logs located at: %windir%\windowsupdate.log you may also see this error present like this:

FATAL: SelfUpdate check failed, err = 0x8024402C
2013-05-11 11:41:27:095 1208 2344 Agent  * WARNING: Skipping scan, self-update check returned 0x8024402C
2013-05-11 11:41:27:095 1208 2344 Agent  * WARNING: Exit code = 0x8024402C


This issue is commonly caused by Firewall Settings not being correctly set within Internet Explorer. There are 3 ways in which you can attempt to correct this error:

Method 1:

Download and run the Microsoft Windows Update Readiness Tool located at: http://support.microsoft.com/kb/947821 . If this fails to solve the issue then please try one of the other methods.

Method 2:

This Method is for if you ar ein a corporation or campus that uses a Proxy Server.
  1. Open Internet Explorer and go to Tools -> Internet Options
    Windows Update Error 0x8024402C
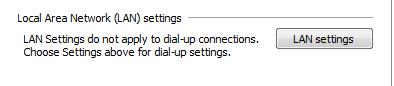
  2. Click on the Connections Tab, select LAN Settings and choose OK
    Windows Update Error 0x8024402CWindows Update Error 0x8024402C
  3. Choose the Advanced Button
  4. Clear any entries under the exceptions window and choose OK
    Windows Update Error 0x8024402C
  5. Open a command prompt:
    1. In Windows 7, Vista, 2008 either:
      1. Go to start  chose run and type in cmd and press OK . Or:
      2. Type command prompt into the search bar in the start menu
        Windows Update Error 0x8024402C
    2. In Windows 8 
      1. Go to the Start Screen and type command prompt. This will open a search screen where you can then select command prompt from the right hand side
        Windows Update Error 0x8024402C
  6. in the command prompt window, enter the following pressing Enter After each command
    1. netsh winhttp reset proxy
    2. net stop wuauserv
    3. net start wuauserv
      Windows Update Error 0x8024402C
  7. restart the computer and try and install updates again
Method 3:
  1. Open Internet Explorer
    Windows Update Error 0x8024402C
  2. Go to Tools -> Internet Options
    Windows Update Error 0x8024402C
  3. Click on Connections -> LAN Settings
    Windows Update Error 0x8024402C

    Windows Update Error 0x8024402C
  4. Select Automatically Detect Settings 
    Windows Update Error 0x8024402C
  5. Choose OK
  6. close and re open Internet Explorer and try installing updates again.


Saturday, May 4, 2013

IE 10 Group Policy Settings in Windows 8


IE 10 Group Policy Settings in Windows 8


If you are running a 2008 or 2003 Domain, the group policy settings for Internet Explorer 10 are missing. In Fact, several Windows 8 options are not present if you look hard enough.

In order to leverage the Group Policy options available in Windows 8 and Internet Explorer 10 you need to Install Microsoft Remote Administration Tools (RSAT) available here: http://www.microsoft.com/en-us/download/details.aspx?id=28972 . After you install this tool, you connect it to your 2008 Domain Controller and the Windows 8 Options will be available to you.

This Article can also be found on our sister site DizzyIT.com at: http://dizzyit.com/2013/05/05/10-group-policy-settings-windows-8/

Tuesday, April 9, 2013

How to use IE 10 Metro / Modern style view in Windows 8

How to use IE 10 Metro / Modern style view in Windows 8


IE 10 in Windows 8 introduces Metro View (also known as Modern View)for Internet Explorer. This view will place the Internet explorer browser on the desktop of the Windows 8 computer this feature is especially great for laptop machines, but can also be utilized in Kiosk Mode style applications as well.

To Use this Feature:

Method 1


  1. Open Internet Explorer from the Start Menu in Internet Explorer 8. By default this will take you straight to the Metro / Modern IE Interface
How to use IE 10 Metro  Modern style view in Windows 8

How to use IE 10 Metro  Modern style view in Windows 8


2. To navigate and manipulate your way around this screen can be a little tricky. to bring up the options menu, you need to either right click on an empty area, press Windows Key + z. On a Tablet Computer, swipe from the bottom  or top of the touch screen.

3. Doing the Above will open a black windows in your screen as shown. The + will open a new tab, while the ... button will open IE Tools, in this case a new in private tab
How to use IE 10 Metro Modern style view in Windows 8

How to use IE 10 Metro  Modern style view in Windows 8

4. To exit the Metro / Modern View, you follow the steps in step 2, and then choose the spanner / wrench icon in the lower left corner. Now, choose view on the desktop which will take you to the Windows 8 Desktop View.

How to use IE 10 Metro  Modern style view in Windows 8

How to use IE 10 Metro  Modern style view in Windows 8

5. If you want to return to the Metro / Modern view you can press the windows key / return to the start menu and choose Internet Explorer from there.

This Article can also be found on our sister site DizzyIT.com at: http://dizzyit.com/2013/04/10/10-metro-modern-style-view-windows-8/


Monday, May 14, 2012

Opening a window in full screen mode in a batch file


Opening a window in full screen mode in a batch file


this can be done using the start /max statement at the start of the command.in context this can be used to open an IE window in full screen for portal access or similar.


start /max "%programfiles%\internet explorer\iexplore.exe" http://www.dizzyit.com

 the same can be used to start in minimized mode with start /min

Tuesday, January 17, 2012

VSphere error : Your Current security settings do not allow this file to be downloaded


VSphere error : Your Current security settings do not allow this file to be downloaded


I got this message in VSphere while trying to configure the Auto deploy feature ( specifically downloading the TFTP boot ZIP) and logically its not a VSphere issue at all.
the issue is due to IE security settings in the Internet Zone having file download disabled. to rectify just adjust this is IE:
  1. Open Internet Explorer
  2. choose tools -> internet options
  3. select the security tab
  4. select internet then custom level
  5. scroll down about half way to downloads and change the file download radio button to enable
  6. OK till your back at IE
heres the screen your looking for: