Search The Web

Showing posts with label 2008. Show all posts

Monday, May 27, 2013

Windows Update Error 0x8024402C in Windows 7, 8, 2012, 2008 R2, Vista

Windows Update Error 0x8024402C in Windows 7, 8, 2012, 2008 R2, Vista


Windows Update Error 0x8024402C occurs when running windows update and you try to connect to the Windows or Microsoft Update Website.

Please see this post for an overview of how to troubleshoot Windows Updates: How to Troubleshoot Windows Update Issues

if you view the logs located at: %windir%\windowsupdate.log you may also see this error present like this:

FATAL: SelfUpdate check failed, err = 0x8024402C
2013-05-11 11:41:27:095 1208 2344 Agent  * WARNING: Skipping scan, self-update check returned 0x8024402C
2013-05-11 11:41:27:095 1208 2344 Agent  * WARNING: Exit code = 0x8024402C


This issue is commonly caused by Firewall Settings not being correctly set within Internet Explorer. There are 3 ways in which you can attempt to correct this error:

Method 1:

Download and run the Microsoft Windows Update Readiness Tool located at: http://support.microsoft.com/kb/947821 . If this fails to solve the issue then please try one of the other methods.

Method 2:

This Method is for if you ar ein a corporation or campus that uses a Proxy Server.
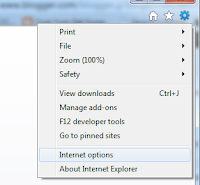
  1. Open Internet Explorer and go to Tools -> Internet Options
    Windows Update Error 0x8024402C
  2. Click on the Connections Tab, select LAN Settings and choose OK
    Windows Update Error 0x8024402CWindows Update Error 0x8024402C
  3. Choose the Advanced Button
  4. Clear any entries under the exceptions window and choose OK
    Windows Update Error 0x8024402C
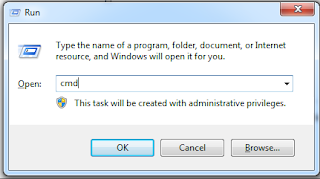
  5. Open a command prompt:
    1. In Windows 7, Vista, 2008 either:
      1. Go to start  chose run and type in cmd and press OK . Or:
      2. Type command prompt into the search bar in the start menu
        Windows Update Error 0x8024402C
    2. In Windows 8 
      1. Go to the Start Screen and type command prompt. This will open a search screen where you can then select command prompt from the right hand side
        Windows Update Error 0x8024402C
  6. in the command prompt window, enter the following pressing Enter After each command
    1. netsh winhttp reset proxy
    2. net stop wuauserv
    3. net start wuauserv
      Windows Update Error 0x8024402C
  7. restart the computer and try and install updates again
Method 3:
  1. Open Internet Explorer
    Windows Update Error 0x8024402C
  2. Go to Tools -> Internet Options
    Windows Update Error 0x8024402C
  3. Click on Connections -> LAN Settings
    Windows Update Error 0x8024402C

    Windows Update Error 0x8024402C
  4. Select Automatically Detect Settings 
    Windows Update Error 0x8024402C
  5. Choose OK
  6. close and re open Internet Explorer and try installing updates again.

Friday, April 12, 2013

How to Install Features and Roles using PowerShell in Server 2012 and 2008

How to Install Features and Roles using PowerShell in Server 2012 and 2008


Server 2012 allows you to install features and roles via PowerShell. Before doing this, you may need to load the Server Manager Module with the command Import-Module Servermanager .


Firstly, you need to know the name of the windows feature / role that you wish to install. To find this information you enter the command Get-WindowsFeature . This will list the features available to install.


Server 2012

To install a feature or Role on a local machine, open PowerShell and type: install-windowsfeature {featurename} using the feature name you previously identified.


 Often this will require a restart,so you can add the -restart switch to the end of the command if you wish. It is also possible to install a feature on a remote machine using PowerShell by adding the -computername switch to the above command.

Server 2008

In Server 2008, the command to install is a little different to the above, but the switches are the same. The command used to install is add-WindowsFeature {featurename}  .


This Article can also be viewed on or sister site DizzyIT.com at http://dizzyit.com/2013/04/13/install-features-roles-powershell-server-2012-2008/

Saturday, March 30, 2013

Remove Network Printers from Command Line or Script


Remove Network Printers from Command Line or Script


There are several options when it comes to removing printers via command line / script.The first option is to use the "rundll32 printui.dll" method. For this, open a command prompt and type:

rundll32 printui.dll,PrintUIEntry /dn /n \\printsvr\printername

if you want the operation to be silent, then use the /q switch at the end. this is especially useful if you have multiple printers that you want to remove via a batch file and/or if you are unsure if the printers are installed on the end users machines. If the printer is not currently installed and you attempt to remove it without the /q switch then you will receive an error. The figure below shows the command in its entirety:
Remove Network Printers from Command Line or Script
The next method would be to use a VB script such as this :
to make the script work, just replace the \\PRINTSERVER\PRINTERNAME" field with the details of your network printer and save as a .vbs file. to call the script just open up an administrator command prompt and type in " cscript scriptname.vbs " where scriptname is the name of your script.
To delete more printers just another line to the  " Dim sPrinterName "  lines with the printer number at the end, and then again  add another objNetwork.RemovePrinterConnection sPrinterName2, True, True line that reflects the printer number you just added.
Likewise, to remove only one printer just remove one of the above lines.


Option Explicit

  Dim objNetwork, objPrinters

  Set objNetwork = CreateObject("WScript.Network")
  Set objPrinters = objNetwork.EnumPrinterConnections

  ' ### Delete selected network printer

  Dim sPrinterName1
 Dim sPrinterName2
  sPrinterName1 = "\\PRINTSERVER\PRINTERNAME"
 sPrinterName2 = "\\PRINTSERVER\PRINTERNAME"
  objNetwork.RemovePrinterConnection sPrinterName1, True, True
 objNetwork.RemovePrinterConnection sPrinterName2, True, True

I found with this method however that it will error out if that printer does not exist. im not enough of a VB guru to tell you if its possible to quieten it down to run silently.

When all is said and done, there is a much better way of doing this, and that is with Group Policy Preferences. this gives you centralized control over your printer environments, allowing you to add and remove and update printers for small groups or your entire organisation.
Group Policy Preferences will be covered for printers in an upcoming entry.
This article can also be found on our You Tube Channel:


Sunday, March 17, 2013

Un install / Reset TCPIP stack in Windows Server, 8, 7, Vista, XP

Un install / Reset TCPIP stack in Windows Server, 8, 7, Vista, XP


by Graham Regan
In earlier versions of Windows (2000 and before) it was possible to remove and re install TCP/IP in Windows if there was a corruption / issue. this was done from add remove programs.
From Windows XP onwards, TCP/IP became a core component of Windows and cannot be removed. Instead, net shell is used to reset the stack.
The command to do this is (from the command prompt)
netsh int reset
e.g. netsh int reset c:\resetlog.txt
A reboot is then needed to complete the process.
the log file path is for logging the reset process  and can be used to troubleshoot / confirm that the reset has been performed correctly.
This command resets two registry keys, which has the same effect of removing and re installing the TCP/IP stack.
The registry key effected are:
system\currentcontrolset\services\tcpip\parameters and system\currentcontrolset\services\dhcp\parameters .


Monday, March 4, 2013

PowerShell - Set Execution Policy - Files Could not be Loaded because the running of scripts is disabled on this system.

PowerShell - Set Execution Policy -  Files Could not be Loaded because the running of scripts is disabled on this system.


when using PowerShell you may get an error stating that " Files Could not be Loaded because the running of scripts is disabled on this system. Please provide a valid certificate with which to sign the files" as shown below:


This at a basic level means that your security settings in PowerShell are preventing you from running the script ( the execution policy.

To fix this, you need to set the execution policy to a more relaxed setting. these are as follows:

  • Restricted - No Scripts can be run. Windows PowerShell can only be used in interactive mode.
  • All Signed - Only Scripts signed by a trusted publisher can be run
  • RemoteSigned - Downloaded scripts must be signed by a trusted publisher before they can be run
  • Unrestricted - No Restrictions, any PowerShell script can be run
At the time of writing, PowerShell comes out of the box in restricted mode.

To check which execution policy your system is running type Get-ExecutionPolicy


To change to policy you type Set-Execution Policy . When you run and go to a less secure setting, you will get a large warning asking if you want to do so
e.g. Set-ExecutionPolicy RemoteSigned.


It's not recommended to use unsigned as this would allow anyone who accesses the system to run malicious or damaging code on your system. Most individuals will settle on Remote Signed, however before doing so in an organisation please ensure that this complies with your organisations security settings.

for a video walk through of this, please check this youtube video from our sister site www.dizzyit.com . The article can also be located there.


Sunday, February 17, 2013

Windows 2008 Sever Core / Dos Networking Netsh Commands

Windows 2008 Sever Core / Dos Networking Netsh Commands

Some Common command line tools for Networking in Server 2008 and Dos:
  • to set IP in Dos / 2008 server core: netsh interface ipv4 set address name=2 source=static address= mask= gateway=
  • use netshell to verify the "name" of the interface: netsh interface ipv4 show interfaces
  • to set DNS server IP in server core: netsh interface ipv4 add dnsserver name=2 address= index=1
  • to name a server in server core: netsh renamecomputer %computername% /newname: /userd: /passwordd: /reboot:0  .  Note: the dd in passwordd is not a mistype, its the spelling that is used the reboot:0 will force the machine to reboot
  • to join a domain:
    netdom join %computername% /domain: /username: /passwordd /reboot:0

  • to disable firewall: netsh advfirewall set allprofiles state off

  • use ocsetup command to add / remove roles
  • to uninstall DNS: ocsetup DNS-Server-Core-Role /uninstall
  • to uninstall DHCP: ocsetup DHCPServercore /uninstall
  • to enable remote management so it can be be administered from remote computer:  
    1. WinRM quickconfig (on the remote comp)

Sunday, March 4, 2012

start and stop services via batch file / command prompt

start and stop services via batch file / command prompt


To start and stop services with a batch file is very easy and is useful for scheduled tasks where you may want to regularly restart a service for various reasons
Firstly, you need to know the name of the service. to locate this you go to computer management -> services and look for the name of the service you need to restart. In this case we will use the Print Spooler service.
your commands to stop the service are net stop "service name" and your command to start it are net start "service name"
so to restart as a batch file would look like"
@Echo Off
REM this will restart the prince spooler service

net stop "Print Spooler"
net start "print spooler"
exit
as usual you would want to add a remark (REM) to the start of the batch file to describe what you would like to do.
you can combine these commands for restarting complex systems such as IIS. as an exambple, this series of command will restart IIS's web, FTP and SMTP services
@Echo off
REM this restarts IIS's web, SMTP and FTP services
net stop "World Wide Web Publishing Service"
net start "World Wide Web Publishing Service"
net stop "FTP Publishing Service"
net start "FTP Publishing Service"
net stop "Simple Mail Transport Protocol (SMTP)"
net start "Simple Mail Transport Protocol (SMTP)"
so as you can see this is all pretty straight forward stuff. from here you can save the batch file and add it as a scheduled task in windows (more on that later)

Wednesday, November 30, 2011

Extending a Share Quota in server 2008


In server 2008, you use the Share and Storage Management tool to provision shares and storage. In this tool you can create a quota for a share. this is a good idea to stop data sprawl which can occur, especially on shared drives. But what if you want to manage, extend or decrease this quota?
for some reason in their infinite wisdom, Microsoft doesn’t allow you to do so from the Share and Storage Management Tools Window. To increase the quota size:
  1. open File Server Resource Manger
  2. expand Quota Management and choose Quotas
  3. This will present all the available Quotas (known as Source Templates) that you have configured.
  4. Find the source template you want to extend, right click and choose edit quota properties
  5. From here you are shown the Quota template from which your folder pulls its settings, the specific space limitations of this share and any warnings that you have configured for out of space notifications
  6. As you an see above, I have set the Quota to be 350GB in this instance (from a 100GB template) and configured email and event log notifications (note that for email notifications to work you will need to configure SMTP in IIS)
  7. click ok and your quota has been set!
please note that this article can also be viewed at our sister site dizzyit.com at : http://dizzyit.com/2011/12/01/extending-share-quota-server-2008/

Wednesday, November 9, 2011

Initial Configuration Tasks screen missing in Server 2008


Initial Configuration Tasks screen missing in Server 2008


You either love it or hate it, the initial configuration tasks screen that comes up when you first login to a Server 2008 box.
down in the bottom right hand corner is a little check box where you can elect to not show the window at logon. This is great until you realize that perhaps you do indeed want to view this at logon in the future, or perhaps right now.
get the page back go to start -> Run or Start -> search and type in “oobe” without the quotes and the page will re- appear.