Search The Web

Wednesday, March 25, 2015

DHCP Admin Group in Server 2012

DHCP Admin Group in Server 2012

The DHCP admin group is a Windows security group used to provide DHCP admin access to users who need to perform DHCP admin function in their work role(s). The sister group, DHCP Users provides read only membership to see DHCP information.

In Server 2012, Microsoft disabled the DHCP users group and hid it from view. This can be a bit frustrating if you need to use this group! The reason I believe was that Microsoft considered this to be a more secure arrangement.

Re establishing the DHCP Admin and DHCP user groups is rather simple. On the Server, open an administrative command prompt and enter: netsh dhcp add securitygroups then press enter. This will add both groups to your group management console (you may need to refresh to see them)

This article can also be found on our sister site Dizzyit.com at: http://dizzyit.com/2015/03/26/dhcp-admin-group-in-server-2012/
Adding DHCP Admin and User Groups

Adding DHCP Admin and User Groups

Monday, March 9, 2015

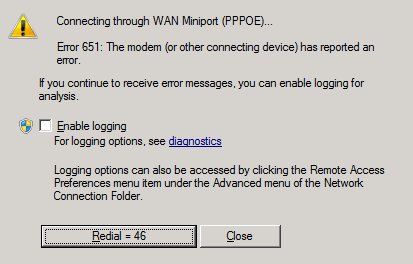
Windows Error 651

Windows Error 651

Windows Error 651
Windows Error 651
Windows Error 651 occurs across most modern versions of Windows, relating primarily to WAN connections. there are a few ways to resolve this as follows:
  1. The first thing to check is go to Control Panel\Network and Internet\Network Connections and right click on broadband connections [WAN Miniport(PPPOE)] and un-check set as default. If necessary reboot to check.
If the above fails, then here is a list of things to check and run through to get this issue resolved:
  • Reset your TCP/IP Settings in Windows.
  • If you are using a Laptop, make sure the wireless switch or button is turned on (this is such a common issue!).
  • Replace the RAS PPPoE driver in Windows:
    1. Open a Command Prompt as Administrator (right click -> run as administrator). 
    2. Select all the code below, then right click it and click Copy:
    3. TAKEOWN /F "C:\Windows\system32\drivers\raspppoe.sys"
    4. ICACLS "C:\Windows\system32\drivers\raspppoe.sys" /grant administrators:F
    5. Right click in the Command Prompt window and click Paste.
    6. Press Enter.
    7. Once it has finished, close the Command Prompt.
    8. Go to the following folder:
      C:\Windows\system32\drivers
    9. Rename the raspppoe.sys file to raspppoe2.sys
    10. Right click on the following file and click Save Target As / Save link as:
      Vista RAS PPPoE Driver.
    11. Save it in the C:\Windows\system32\drivers folder.
    12. Restart the computer.
  • If using a Modem, obtain the latest driver.
  • Reset your router.
  • Re-install your network card drivers.
This article can also be found on our sister site http://Dizzyit.com at http://dizzyit.com/2015/03/10/windows-error-651/
Source: Microsoft Technet

Sunday, March 8, 2015

Grant Sudo Access in Ubuntu

Grant Sudo Access in Ubuntu


To make changes in Ubuntu, you need to be a member of the "Super Users" or Sudo group. Membership of this group acts like the administrator group on a windows system, allowing users to make changes to the operating system. Ubuntu will prompt you for the sudo password (which is recommended to be different to your normal user password for security reasons) when you attempt to make changes to the OS.

To grant a user sudo access:
  1. log in with your own sudo level access account
  2. enter the command sudo adduser sudo
Grant Sudo In Ubuntu
This Article can also be found on our sister site www.dizzyit.com at: http://dizzyit.com/2015/03/09/grant-sudo-access-ubuntu/

Tuesday, July 8, 2014

Clear Cached Credentials in Windows

Clear Cached Credentials in Windows


Cached credentials in windows can cause issues, especially when users change passwords and aren't able to access network resources. There are a few ways you can manage this, and even script it into your environment if this is causing you issues.

Credential Manager:

Credential Manager is a Windows control panel item that shows all the cached credentials on your system. to access this go to control panel -> cached credentials and locate the credentials that you wish to remove. This can also be accessed by opening the run command and entering control keymgr.dll

Windows Credential Manager

The DOS / script method

If dos is more your flavour or you would like to script this then there are 2 commands that you can use. Firstly, if there is a server specifically that you would like to clear the credentials from then you can use the command net use \\ /del where is the name of the serve that you wish to clear the credentials for and you may also need to use an FQDN depending on your network / DNS set up.
Delete windows credentials in DOS / script
Alternatively you can also use net use * /del  to clear all cached credentials.
Delete Cached Windows Credentials
Please note that these commands are run on the client server not on the server resource.
This post can also be found on our sister site DizzyIT.com at http://dizzyit.com/2014/06/13/clear-cached-credentials-windows/


How Set a Static IP Address in Apple Mac OS X

How Set a Static IP Address in Apple Mac OS X
 

For those new to OS X from the Windows world (like I was), finding your way around can be a little frustrating in a world sans right mouse click! One task thats quite common (and one I came across this week)  is wanting to set a static IP address in OS X. Here's how it's done!
1. Open System Preferences with this icon:
Mac OS X System Preferences Icon
2. Under the Internet and Wireless menu choose Network
Mac OS X Network Icon
3. Select Ethernet Network
Apple Mac OS X Ethernet Icon
4. Select the Configure IPv4 Drop down list and select Manually
Apple Mac OS X Configure IPv4
5. Enter the Static IP, Subnet Mask, Router (Gateway) , DNS Server and Search Domain followed by Apply
Apple Mac OS X Static IP Address
6. And your done! To reset back to DHCP - just reset the Manually setting to DHCP

This guide can also be found on our sister site Dizzyit.com at http://dizzyit.com/2014/07/06/set-static-ip-address-apple-mac-os-x/

Tuesday, April 8, 2014

Use Powershell to Uninstall or Install Windows Roles and Features

Use Powershell to Uninstall or Install Windows Roles and Features 

You can use Powershell or uninstall or install Windows Roles and Features instead of using the GUI. This is especially useful in two scenarios : Server Core installations and also for scripting (new server installs, remote installs etc).
Firstly, you will need to identify the name of the Windows Feature that you wish to add / remove. Open an Administrative powershell prompt and type:  get-windowsfeature
Get-Windowsfeature
Get-Windowsfeature
Once you have identified the roles and feature that you wish to remove (in this case we are going to remove the gui shell) tye the command uninstall-windowsfeature If you want to force a reboot at the end of the process then use the -reboot switch.
Uninstall-windowsfeature
If you wanted to re install this feature, or install any other feature then again open an administrative powershell prompt and type install-windowsfeature
Install-WindowsFeature
Again, if you wanted to force the reboot (especially useful when scripting this then add the -reboot switch.


How To Fix Windows Update Error 80070005.

How To Fix Windows Update Error 80070005.


Windows Update Error 80070005 is usually caused by something going awry in your user permissions to the point where Windows Updates cannot install as it no longer has permissions. The fastest way I am aware of to get around Windows Update Error 80070005 is as follows:
  1. Log off the current user and log in with the administrator Account
  2. attempt to install updates from Microsoft updates ( or local WSUS server if applicable)
  3. after updates have been re installed reboot the computer and log in as the original user.
  4. The user should now be able to install updates
I'm not sure why this works, but it does! I would hazzard a guess that logging in as local admin allows the computer account to reset the ACL permissions that it needs.
The other things to check in troubleshooting Windows Update Error 80070005 are:
  1. Make sure that the firewall is not blocking windows updates. to verify this disable your firewall and try
  2. is the user profile generally corrupt? if so try and old out the profile (details on how to do so here: http://dizzyit.com/2011/10/29/how-do-i-old-out-a-windows-7-user-profile/)
  3. run the windows update repair tool and see if this fixes your issue (details here: http://dizzyit.com/2013/06/07/fix-windows-update-issues/)
This article can also be found on our sister site DizzyIT .com at : http://dizzyit.com/2014/04/07/fix-windows-update-error-80070005/